Advanced Guide
Road map
There are many tools, packages and scripts, that can be used to manage Braiins OS+. For better navigation, use the following tree:
Install Braiins OS+
Using BOS+ Toolbox (Install Braiins OS+ using BOS+ Toolbox)
Using web package (Install Braiins OS+ using Web package)
Using SD card (Install Braiins OS+ using SD card)
Using SD card and miner tool (SD to NAND install using the Miner tool)
Using SSH scripts (Install Braiins OS+ using SSH package)
Update Braiins OS+
Using BOS+ Toolbox (Update Braiins OS+ using BOS+ Toolbox)
Using OPKG (Update Braiins OS+ using OPKG)
Using sysupgrade package (Switch to Braiins OS+ from other versions using Sysupgrade)
Using bos2bos script (Bos2Bos script)
Switching to Braiins OS (version without autotuning)
Using sysupgrade package (Switch to Braiins OS (without autotuning) from other versions using Sysupgrade)
Using bos2bos script (Bos2Bos script)
Switching to Braiins OS+ (version with autotuning)
Using OPKG (Switch to Braiins OS+ from other versions using OPKG)
Using sysupgrade package (Switch to Braiins OS+ from other versions using Sysupgrade)
Using bos2bos script (Bos2Bos script)
Reset to initial Braiins OS version (version, which was installed for the first time on device) - factory reset
Using OPKG (Braiins OS+ factory reset using OPKG)
Using SD card (Braiins OS+ factory reset using SD card)
Using "miner" tool (Braiins OS+ factory reset using the Miner tool)
Using bos2bos script (Bos2Bos script)
Uninstall Braiins OS+
Using BOS+ Toolbox (Uninstall Braiins OS+ using BOS+ Toolbox)
Using SSH scripts (Uninstall Braiins OS+ using SSH package)
BOS+ Toolbox
BOS+ Toolbox is a new tool, that allow the user to easily install, uninstall, update, detect and configure Braiins OS+. It also allows to do it in batch mode, which makes the management of a larger number of devices more easy. This is the recommended way to manage your machines.
Usage
Download the BOS+ Toolbox from our website.
Create a new text file, change the ".txt" ending to ".csv" and insert the IP addresses on which you want execute the commands. Put that file in the directory where the BOS+ Toolbox is located. Use only one IP address per line!
Follow the sections bellow
Features, PROs and CONs of this method:
installs Braiins OS+ remotely
updates Braiins OS+ remotely
uninstalls Braiins OS+ remotely
configures Braiins OS+ remotely
scans the network for machines
migrates the whole configuration by default (can be adjusted) when installing Braiins OS+
migrates the network configuration by default (can be adjusted) when uninstalling Braiins OS+
parameters are available to customize the process
turns on autotuning on default power limit (1420W) when installing Braiins OS+
batch mode available to manage multiple devices at once
easy to use
does not work on miner with locked SSH
Install Braiins OS+ using BOS+ Toolbox
Download BOS+ Toolbox from our website.
Create a new text file, change the ".txt" ending to ".csv" and insert the IP addresses on which you want execute the commands. Put that file in the directory where the BOS+ Toolbox is located. Use only one IP address per line!
Once you have downloaded BOS+ Toolbox, open your command-line interpreter (e.g. CMD for Windows, Terminal for Ubuntu, etc.)
Replace the FILE_PATH_TO_BOS+_TOOLBOX placeholder in the command below with the actual file path where you saved the BOS+ Toolbox. Then switch to that file path by running the command:
cd FILE_PATH_TO_BOS+_TOOLBOXNow replace the listOfMiners.csv placeholder with your file name in the command below and run the appropriate command for your operating system:
For Windows command terminal:
bos-plus-toolbox.exe install ARGUMENTS HOSTNAMEFor Linux command terminal:
./bos-plus-toolbox install ARGUMENTS HOSTNAMENote: when using BOS+ Toolbox for Linux, you need to make it executable with the following command (this has to be done only once):
chmod u+x ./bos-plus-toolbox
You can use the following arguments to adjust the process:
Important note: When installing Braiins OS+ on a single device, use the HOSTNAME argument (IP address). When installing Braiins OS+ on multiple devices, do NOT use the HOSTNAME argument, but use the --batch BATCH argument instead.
Arguments |
Description |
|---|---|
-h, --help |
show this help message and exit |
--batch BATCH |
path to file with list of hosts (IP addresses) to install to |
--backup |
do miner backup before upgrade |
--no-nand-backup |
skip full NAND backup (config is still being backed up) |
--pool-user [POOL_USER] |
set username and workername for default pool |
--psu-power-limit [PSU_POWER_LIMIT] |
set PSU power limit (in watts) |
--no-keep-network |
do not keep miner network configuration (use DHCP) |
--no-keep-pools |
do not keep miner pool configuration |
--no-keep-hostname |
do not keep miner hostname and generate new one based on MAC |
--keep-hostname |
force to keep any miner hostname |
--no-wait |
do not wait until system is fully upgraded |
--dry-run |
do all upgrade steps without actual upgrade |
--post-upgrade [POST_UPGRADE] |
path to directory with stage3.sh script |
--install-password INSTALL_PASSWORD |
ssh password for installation |
Example:
bos-plus-toolbox.exe install --batch listOfMiners.csv --psu-power-limit 1200 --install-password admin
This command will install Braiins OS+ on the miners, that are specified in the listOfMiners.csv file and set the power limit to 1200 on all of them. The command will also automatically insert the SSH password admin, when the miner asks for it.
Update Braiins OS+ using BOS+ Toolbox
Download the BOS+ Toolbox from our website.
Create a new text file, change the ".txt" ending to ".csv" and insert the IP addresses on which you want execute the commands. Put that file in the directory where the BOS+ Toolbox is located.
Once you have downloaded BOS+ Toolbox, open your command-line interpreter (e.g. CMD for Windows, Terminal for Ubuntu, etc.)
Replace the FILE_PATH_TO_BOS+_TOOLBOX placeholder in the command below with the actual file path where you saved the BOS+ Toolbox. Then switch to that file path by running the command:
cd FILE_PATH_TO_BOS+_TOOLBOXNow replace the listOfMiners.csv placeholder with your file name in the command below and run the appropriate command for your operating system:
For Windows command terminal:
bos-plus-toolbox.exe update ARGUMENTS HOSTNAMEFor Linux command terminal:
./bos-plus-toolbox update ARGUMENTS HOSTNAMENote: when using BOS+ Toolbox for Linux, you need to make it executable with the following command (this has to be done only once):
chmod u+x ./bos-plus-toolbox
You can use the following arguments to adjust the process:
Important note: When updating Braiins OS+ on a single device, use the HOSTNAME argument (IP address). When updating Braiins OS+ on multiple devices, do NOT use the HOSTNAME argument, but use the --batch BATCH argument instead.
Arguments |
Description |
|---|---|
--h, --help |
show this help message and exit |
--batch BATCH |
path to file with list of hosts to install to |
-p PASSWORD, --password PASSWORD |
administration password |
-i, --ignore |
no halt on errors |
Example:
bos-plus-toolbox.exe update --batch listOfMiners.csv
This command will look for an update for the miners, that are specified in the listOfMiners.csv and update them if there is a new version of firmware.
Uninstall Braiins OS+ using BOS+ Toolbox
Download the BOS+ Toolbox from our website.
Create a new text file in your text editor and insert the IP addresses on which you want execute the commands. Each IP address should be separated by a comma. (Note that you can find the IP address in the Braiins OS+ web interface by going to Status -> Overview.) Then save the file in the same directory as you saved the BOS+ Toolbox and change the ".txt" ending to ".csv".
Once you have downloaded BOS+ Toolbox and saved the .csv file, open your command-line interpreter (e.g. CMD for Windows, Terminal for Ubuntu, etc.).
Replace the FILE_PATH_TO_BOS+_TOOLBOX placeholder in the command below with the actual file path where you saved the BOS+ Toolbox. Then switch to that file path by running the command:
cd FILE_PATH_TO_BOS+_TOOLBOXNow replace the listOfMiners.csv placeholder with your file name in the command below and run the appropriate command for your operating system:
For Windows command terminal:
bos-plus-toolbox.exe uninstall ARGUMENTS HOSTNAMEFor Linux command terminal:
./bos-plus-toolbox uninstall ARGUMENTS HOSTNAMENote: when using BOS+ Toolbox for Linux, you need to make it executable with the following command (this has to be done only once):
chmod u+x ./bos-plus-toolbox
You can use the following arguments to adjust the process:
Important note: When uninstalling Braiins OS+ on a single device, use the HOSTNAME argument (IP address). When uninstalling Braiins OS+ on multiple devices, do NOT use the HOSTNAME argument, but use the --batch BATCH argument instead.
Arguments |
Description |
|---|---|
-h, --help |
show this help message and exit |
--batch BATCH |
path to file with list of hosts |
--factory-image FACTORY_IMAGE |
path/url to original firmware upgrade image (default: Antminer-S9-all-201812051512-autofreq-user-Update2UBI- NF.tar.gz) |
Example:
bos-plus-toolbox.exe uninstall --batch listOfMiners.csv
This command will uninstall Braiins OS+ from the miners, that are specified in the listOfMiners.csv file and install a default stock firmware (Antminer-S9-all-201812051512-autofreq-user-Update2UBI-NF.tar.gz).
Configure Braiins OS+ using BOS+ Toolbox
Download the BOS+ Toolbox from our website.
Create a new text file in your text editor and insert the IP addresses on which you want execute the commands. Each IP address should be separated by a comma. (Note that you can find the IP address in the Braiins OS+ web interface by going to Status -> Overview.) Then save the file in the same directory as you saved the BOS+ Toolbox and change the ".txt" ending to ".csv".
Once you have downloaded BOS+ Toolbox and saved the .csv file, open your command-line interpreter (e.g. CMD for Windows, Terminal for Ubuntu, etc.).
Replace the FILE_PATH_TO_BOS+_TOOLBOX placeholder in the command below with the actual file path where you saved the BOS+ Toolbox. Then switch to that file path by running the command:
cd FILE_PATH_TO_BOS+_TOOLBOXNow replace the listOfMiners.csv placeholder with your file name in the command below and run the appropriate command for your operating system:
For Windows command terminal:
bos-plus-toolbox.exe config ARGUMENTS ACTION TABLEFor Linux command terminal:
./bos-plus-toolbox config ARGUMENTS ACTION TABLENote: when using BOS+ Toolbox for Linux, you need to make it executable with the following command (this has to be done only once):
chmod u+x ./bos-plus-toolbox
You can use the following arguments to adjust the process:
Arguments |
Description |
|---|---|
-h, --help |
show this help message and exit |
-u USER, --user USER |
Administration username |
-p PASSWORD, --password PASSWORD |
Administration password or "prompt" |
-c, --check |
Dry run sans writes |
-i, --ignore |
No halt on errors |
You have to use one of the following actions to adjust the process:
Arguments |
Description |
|---|---|
load |
load the current configuration of the miners (specified in the CSV file) and insert them to the CSV file |
save |
save the settings from the CSV file to the miners (this does not apply them) |
apply |
apply the settings, which were copied from the CSV file to the miners |
save_apply |
save and apply the settings from the CSV file to the miners |
Example:
bos-plus-toolbox.exe config --user root load listOfMiners.csv

#edit the CSV file using a spreadsheet editor (e.g. Office Excel, LibreOffice Calc, etc.)

bos-plus-toolbox.exe config --user root save_apply listOfMiners.csv
The first command will load the configuration of the miners, that are specified in the listOfMiners.csv (using the login username root) and save it to the CSV file. You can now open the file and edit what you need. After the file was edited, the second command will copy the settings back to the miners and apply them.
Scan the network to identify miners using BOS+ Toolbox
Download the BOS+ Toolbox from our website.
Create a new text file in your text editor and insert the IP addresses on which you want execute the commands. Each IP address should be separated by a comma. (Note that you can find the IP address in the Braiins OS+ web interface by going to Status -> Overview.) Then save the file in the same directory as you saved the BOS+ Toolbox and change the ".txt" ending to ".csv".
Once you have downloaded BOS+ Toolbox and saved the .csv file, open your command-line interpreter (e.g. CMD for Windows, Terminal for Ubuntu, etc.).
Replace the FILE_PATH_TO_BOS+_TOOLBOX placeholder in the command below with the actual file path where you saved the BOS+ Toolbox. Then switch to that file path by running the command:
cd FILE_PATH_TO_BOS+_TOOLBOXNow replace the listOfMiners.csv placeholder with your file name in the command below and run the appropriate command for your operating system:
For Windows command terminal:
bos-plus-toolbox.exe discover ARGUMENTSFor Linux command terminal:
./bos-plus-toolbox discover ARGUMENTSNote: when using BOS+ Toolbox for Linux, you need to make it executable with the following command (this has to be done only once):
chmod u+x ./bos-plus-toolbox
You can use the following arguments to adjust the process:
Arguments |
Description |
|---|---|
-h, --help |
show this help message and exit |
You have to use one of the following arguments to adjust the process:
Arguments |
Description |
|---|---|
scan |
actively scan provided range of address |
listen |
listen for incoming broadcast from devices (when the IP report button is pressed) |
Example:
bos-plus-toolbox.exe discover scan 10.10.10.0/24
This command will scan the network, in the range 10.10.10.0 - 10.10.10.255 and list the found miners, with their IP addresses.
Web Package
The Web package can be used to switch from stock firmware, which was released before 2019. It should also work on other stock-based firmwares. This package cannot be used on stock firmware, released in 2019 and later, because of the signature verification, that was implemented. The signature verification prevents the usage of other than original stock firmwares.
Features, PROs and CONs of this method:
replaces stock firmware with Braiins OS+ without additional tools
migrates the network configuration
migrates pool URLs, users and passwords
turns on autotuning on default power limit (1420W)
cannot be used on stock firmware released in 2019 and later
cannot configure the installation (e.g. it will always migrate the network settings)
no batch-mode (unless you create your own scripts)
SD card image
If you are running stock firmware, which was released in 2019 and later, the only way to install Braiins OS+ is to insert an SD card with Braiins OS+ flashed on it. In 2019, the SSH connection was locked and the signature verification in the web interface prevents the usage of other than stock firmware usage.
Features, PROs and CONs of this method:
replaces SSH locked stock firmware with Braiins OS+
uses the network configuration stored on the NAND (this can be turned off, see the section Network settings bellow)
turns on autotuning on default power limit (1420W)
does not migrate pool URLs, users and passwords
no batch-mode
Install Braiins OS+ using SD card
Download the SD card image from our website.
Flash the downloaded image on an SD card (e.g. using Etcher). Note: Simple copy to SD card will not work. The SD card has to be flashed!
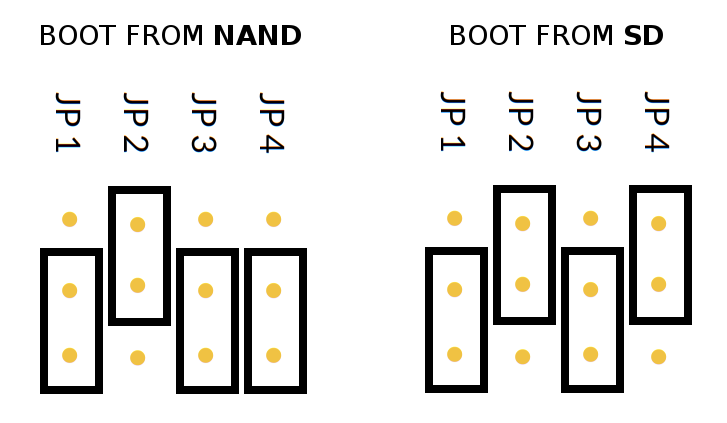
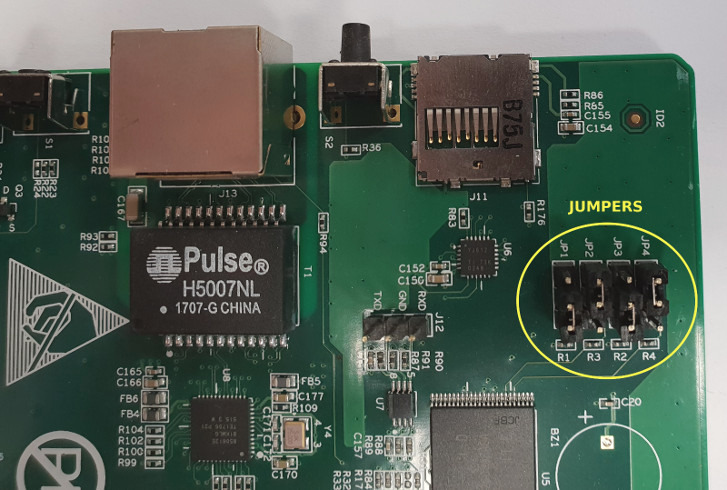
Adjust the jumpers to boot from SD card (instead of NAND memory), as shown below.
Insert the SD card into the device, then start the device.
After a moment, you should be able to access the Braiins OS+ interface through the device’s IP address.
[Optional]: You can now install Braiins OS+ to the NAND (see the section NAND install)
Network settings
By default, network configuration stored on the NAND is used, while running Braiins OS+ from an SD card. This feature can be turned off, by following the steps bellow:
Mount the first FAT partition of the SD card
Open the file uEnv.txt and insert the following string (make sure there is only one string per line)
cfg_override=no
Disabling usage of old network settings is beneficial for the users, that have problems with the miner not being visible in the network (e.g. static IP address used on NAND is out of range of the network). By doing so, DHCP is used.
NAND install
- The SD card can be used to replace the firmware running on NAND with Braiins OS+. This can be done either:
using the web interface - section System -> Install current system to device (NAND)
using the miner tool, via SSH - follow this section of the guide SD to NAND install using the Miner tool
Braiins OS+ factory reset using SD card
You can do a factory reset, by following the steps bellow:
Mount the first FAT partition of the SD card
Open the file uEnv.txt and insert the following string (make sure there is only one string per line)
factory_reset=yes
Remote (SSH) install package
With the Remote (SSH) install package you can install or uninstall Braiins OS+. This method is not recommended, as it requires a Python setup. Use the BOS+ Toolbox instead.
Features, PROs and CONs of this method:
installs Braiins OS+ remotely
uninstalls Braiins OS+ remotely
migrates the whole configuration by default (can be adjusted) when installing Braiins OS+
migrates the network configuration by default (can be adjusted) when uninstalling Braiins OS+
parameters are available to customize the process
turns on autotuning on default power limit (1420W) when installing Braiins OS+
no batch-mode (unless you create your own scripts)
requires a long setup
does not work on miner with locked SSH
Preparing the environment
First, you need to prepare the Python environment. This consists of the following steps:
(Only Windows) Install Ubuntu for Windows 10 available from the Microsoft Store here.
Run the following commands in your command line terminal:
(Note that the commands are compatible with Ubuntu and Ubuntu for Windows 10. If you are using a different distribution of Linux or a different OS, please check the corresponding documentation and edit the commands as necessary.)
#Update the repositories and install dependencies
sudo apt update && sudo apt install python3 python3-virtualenv virtualenv

#Download and extract the firmware package
wget -c http://feeds.braiins-os.com/20.04/braiins-os_am1-s9_ssh_2020-04-30-1-cbf99510-plus.tar.gz -O - | tar -xz

#Change the directory to the unpacked firmware folder
cd ./braiins-os_am1-s9_ssh_2020-04-30-1-cbf99510-plus

#Create a virtual environment and activate it
virtualenv --python=/usr/bin/python3 .env && source .env/bin/activate

#Install the required Python packages
python3 -m pip install -r requirements.txt
Install Braiins OS+ using SSH package
Installation of Braiins OS+ using the so-called SSH Method consists of the following steps:
(Custom Firmware) Flash stock firmware. This step can be skipped if the device is running on stock firmware or on a previous versions of Braiins OS. (Note: It is possible, that Braiins OS+ can be installed directly over a custom firmware, but as they differ from the stock version, it might be necessary to flash stock firmware first.)
(Only Windows) Install Ubuntu for Windows 10 available from the Microsoft Store here.
Prepare the Python environment, which is described in the section Preparing the environment.
Run the following commands in your command line terminal (replace the placeholder
IP_ADDRESSaccordingly) :
(Note that the commands are compatible with Ubuntu and Ubuntu for Windows 10. If you are using a different distribution of Linux or a different OS, please check the corresponding documentation and edit the commands as necessary.)
  #Change the directory to the unpacked firmware folder (if not already in the firmware folder)
cd ./braiins-os_am1-s9_ssh_2019-02-21-0-572dd48c_2020-03-29-1-6b4a0f46

#Activate the virtual environment (if it is not already activated)
source .env/bin/activate

#Run the script to install Braiins OS+
python3 upgrade2bos.py IP_ADDRESS
Note: for more information about the arguments that can be used, use the --help argument.
Uninstall Braiins OS+ using SSH package
Using factory firmware image
First, you need to prepare the Python environment, which is described in the section Preparing the environment.
On an Antminer S9, you can flash a factory firmware image
from the manufacturer’s website, with FACTORY_IMAGE being file path
or URL to the tar.gz (not extracted!) file. Supported images with
corresponding MD5 hashes are listed in the
platform.py
file.
Run (replace the placeholders FACTORY_IMAGE and IP_ADDRESS accordingly):
cd ~/braiins-os_am1-s9_ssh_2019-02-21-0-572dd48c_2020-03-29-1-6b4a0f46 && source .env/bin/activate
python3 restore2factory.py --factory-image FACTORY_IMAGE IP_ADDRESS
Note: for more information about the arguments that can be used, use the --help argument.
Using previously created backup
First, you need to prepare the Python environment, which is described in the section Preparing the environment.
If you created a backup of the original firmware during the installation of Braiins OS+, you can restore it by using the following commands (replace the placeholders BACKUP_ID_DATE and IP_ADDRESS accordingly):
cd ~/braiins-os_am1-s9_ssh_2019-02-21-0-572dd48c_2020-03-29-1-6b4a0f46 && source .env/bin/activate
python3 restore2factory.py backup/BACKUP_ID_DATE/ IP_ADDRESS
Note: This method is not recommended as the backup creation is very finicky. The backup can be corrupted and there is no way to check it. Use at your own risk and make sure, you can access the miner and insert an SD card to it in case the restoration does not finish successfully!
OPKG
OPKG commands can be used after connecting to the miner via SSH. There are many OPKG commands, but regarding Braiins OS+, you need to use only the following:
opkg update - updates the package lists. It's recommended to use this command before other OPKG commands.
opkg install PACKAGE_NAME install the defined package. It's recommended to use opkg update to update the package lists before installing packages.
opkg remove PACKAGE_NAME
Since the firmware change results in a reboot, the following output is expected:
...
Collected errors:
* opkg_conf_load: Could not lock /var/lock/opkg.lock: Resource temporarily unavailable.
  Saving config files...
  Connection to 10.10.10.1 closed by remote host.
  Connection to 10.10.10.1 closed.
Features, PROs and CONs of this method:
update Braiins OS+ remotely
switch to Braiins OS+ from other versions remotely
revert to the initial version of Braiins OS remotely
migrates the configuration and continue to mine without a need to configure anything (when updating or switching to Braiins OS+)
no batch-mode (unless you create your own scripts)
Update Braiins OS+ using OPKG
With OPKG you can easily update your current installation of Braiins OS+, by connecting to the miner via SSH and using the following commands:
opkg update
opkg install firmware

#you can also connect to the miner and run the commands at the same time
ssh root@IP_ADDRESS "opkg update && opkg install firmware"
This will migrate the configuration and continue to mine without a need to configure anything.
Switch to Braiins OS+ from other versions using OPKG
With OPKG you can easily switch to Braiins OS+, by connecting to the miner via SSH and using the following commands:
opkg update
opkg install bos_plus

#you can also connect to the miner and run the commands at the same time
ssh root@IP_ADDRESS "opkg update && opkg install bos_plus"
This will migrate the configuration and continue to mine without a need to configure anything. Default power limit will be set (1420W).
Braiins OS+ factory reset using OPKG
With OPKG you can easily revert to the initial version of Braiins OS (the version, which was installed for the first time on that device), by connecting to the miner via SSH and using the following commands:
opkg update
opkg remove firmware

#you can also connect to the miner and run the commands at the same time
ssh root@IP_ADDRESS "opkg update && opkg remove firmware"
This will reset the configuration to the state after the first Braiins OS installation.
Sysupgrade package
Sysupgrade is used to upgrade the system running on the device. With this method, you can install various versions of Braiins OS or create a backup of the system. Installation of a firmware using Braiins OS web interface or using opkg install firmware uses this method. It's recommended to use the Braiins OS web interface or opkg install firmware instead of this method.
Usage
In order to use sysupgrade, you need to connect to the miner via SSH. The syntax is the following:
sysupgrade [parameters] <image file or URL>
The most important parameters are --help (to display the help) and -F to force the installation. It's not recommended to use this method (besides the way, it is described bellow), unless you really know, what you are doing.
Features, PROs and CONs of this method:
installs various version of Braiins OS, while connected to the miner
migrates the configuration
parameters are available to customize the process
no batch-mode (unless you create your own scripts)
cannot switch to an older version of Braiins OS (released before 2020)
Switch to Braiins OS (without autotuning) from other versions using Sysupgrade
In order to upgrade from older version of Braiins OS or downgrade from Braiins OS+, use the following command (replace the placeholder IP_ADDRESS accordingly):
ssh root@IP_ADDRESS 'wget -O /tmp/firmware.tar https://feeds.braiins-os.org/am1-s9/firmware_2020-04-30-0-259943b5_arm_cortex-a9_neon.tar && sysupgrade /tmp/firmware.tar'
This command contains the following commands:
ssh - to connect to the miner
wget - used for downloading files, in this case the firmware package
sysupgrade - to actually flash the downloaded firmware package
Switch to Braiins OS+ from other versions using Sysupgrade
In order to upgrade from older version of Braiins OS, use the following command (replace the placeholder IP_ADDRESS accordingly):
ssh root@IP_ADDRESS 'wget -O /tmp/firmware.tar http://feeds.braiins-os.com/am1-s9/firmware_2020-04-30-1-cbf99510-plus_arm_cortex-a9_neon.tar && sysupgrade /tmp/firmware.tar'
This command contains the following commands:
ssh - to connect to the miner
wget - used for downloading files, in this case the firmware package
sysupgrade - to actually flash the downloaded firmware package
Note: It's recommended to use the BOS+ Toolbox, Braiins OS web interface or opkg install bos_plus instead of this method.
Bos2Bos script
Bos2Bos script is not recommended to use, unless you experience problems with the installation using the other methods. This method works, only if Braiins OS is already running on the device.
Features, PROs and CONs of this method:
installs any version of Braiins OS remotely
install a clean version of Braiins OS
parameters are available to customize the process
no batch-mode (unless you create your own scripts)
Usage
Usage of the Bos2Bos script requires the following setup:
(Only Windows) Install Ubuntu for Windows 10 available from the Microsoft Store here.
Run the following commands in your command line terminal:
(Note that the commands are compatible with Ubuntu and Ubuntu for Windows 10. If you are using a different distribution of Linux or a different OS, please check the corresponding documentation and edit the commands as necessary.)
#Update the repositories and install dependencies
sudo apt update && sudo apt install python3 python3-virtualenv virtualenv

# clone repository
git clone https://github.com/braiins/braiins-os.git

#change the directory
cd ./braiins-os/braiins-os/

#Create a virtual environment and activate it
virtualenv --python=/usr/bin/python3 .env && source .env/bin/activate

#Install the required Python packages
python3 -m pip install -r requirements.txt
After you succesfully finish the setup, you can use the following commands:
#activate the virtual environment
source .env/bin/activate

#basic usage is the following
python3 bos2bos.py FIRMWARE_URL IP_ADDRESS

#the description of all available parameters can be displayed using the following command
python3 bos2bos.py -h
Miner tool
SD to NAND install using the Miner tool
The SD card can be used to replace the firmware running on NAND with Braiins OS+. This can be done by connecting to the miner via SSH and usage of the following command:
miner nand_install
Braiins OS+ factory reset using the Miner tool
Factory reset can also be done using the Miner tool. Use the following command to do so:
miner nand_install
Detect device with LEDs using Miner tool
You can find a device by turning on LED blinking, using the Miner tool. Use the following command to do so:
#turn on LED blinking
miner fault_light on

#turn off LED blinking
miner fault_light off